Trafalgar Law Cosplay Buy or DIY: Best Build Plan

Deciding trafalgar law cosplay buy or diy comes down to your deadline, your comfort needs, and how “screen-accurate” you want to go. This page is a decision …

For Trafalgar Law cosplay buy or DIY, the best answer is usually neither extreme: buy the hard-to-construct base pieces, then DIY the details that improve fit and recognition. That approach can save time while leaving room for a costume that feels like yours.

Law’s look depends on a few high-visibility choices: the tall spotted hat, the outerwear silhouette, tattoos, and Kikoku. Start with your event date, budget, and skill level—not with a random full set or a giant materials list.

The quick decision: buy, DIY, or build a hybrid

Choose a premade set when you have a close deadline, do not sew often, or need a coordinated outfit with minimal trial and error. You will still want time to try it on, hem it, and test the accessories before an event.

Choose full DIY when you enjoy sewing or prop work, have time for test fits, and want control over fabric, shape, and finish. It offers the most freedom, but it also creates the most chances for delays.

Choose a hybrid build if you want the strongest balance of effort and impact. Buy the coat or top layer, hat, and comfortable basics. Then improve the fit, tattoos, weathering, and small finish details yourself. For most first and second Law builds, this is the sensible route.

Your situation Best route Why
Convention is soon Buy or hybrid You avoid patterning and leave time for alterations.
First cosplay Hybrid A bought base reduces stress; simple upgrades teach useful skills.
You need an exact fit DIY or hybrid Tailoring matters more than a generic size label.
You enjoy sewing and have reference images DIY You control the silhouette and fabric choices.
You are travelling with the costume Buy or hybrid A lightweight, packable build is easier to manage.
You want repeat wear Hybrid Reinforce and upgrade the pieces that take the most use.

If you want a broader walkthrough before deciding what to tackle, see our Trafalgar Law DIY cosplay guide.

Plan the version of Law you want to make

Before ordering or cutting fabric, pick a specific reference image and keep it open while you plan. Law’s outfit changes across appearances, and listings may combine details from different versions. A costume can still look great as a personal interpretation, but a clear reference prevents mismatched colors, layers, and patterns.

Prioritize what reads in photos

Viewers usually notice the outline before they notice tiny details. Put your effort into these elements first:

  1. Hat shape and spot placement. The hat is one of Law’s fastest visual cues.
  2. Outerwear length and fit. A clean shoulder line and the right hem length do more than extra accessories.
  3. Tattoos. Clear, well-placed tattoos add a lot of character in close photos.
  4. A safe, readable Kikoku prop. It should look intentional without becoming hard to carry or unsafe for the venue.

Use photos from the angle you expect to pose in. A detail that looks fine in a mirror can look uneven in a front-facing image.

Build for a full day, not just one photo

A costume should let you sit, walk, eat, and carry a bag. Test the hat while looking down, lift your arms in the coat, and sit in the pants before the event. A slightly less exact shoe choice is often worth it if you can wear it all day without pain.

Cosplay is often a shared, learned craft: people trade techniques, tutorials, and feedback as they build costumes and props. The Smithsonian Folklife discussion of cosplay community learning is a useful reminder that asking another maker for a second opinion is part of the process, not a shortcut.

What to buy and what to DIY, piece by piece

The table below focuses on effort and risk rather than promising one “correct” build. Your budget and local prop rules may change the answer.
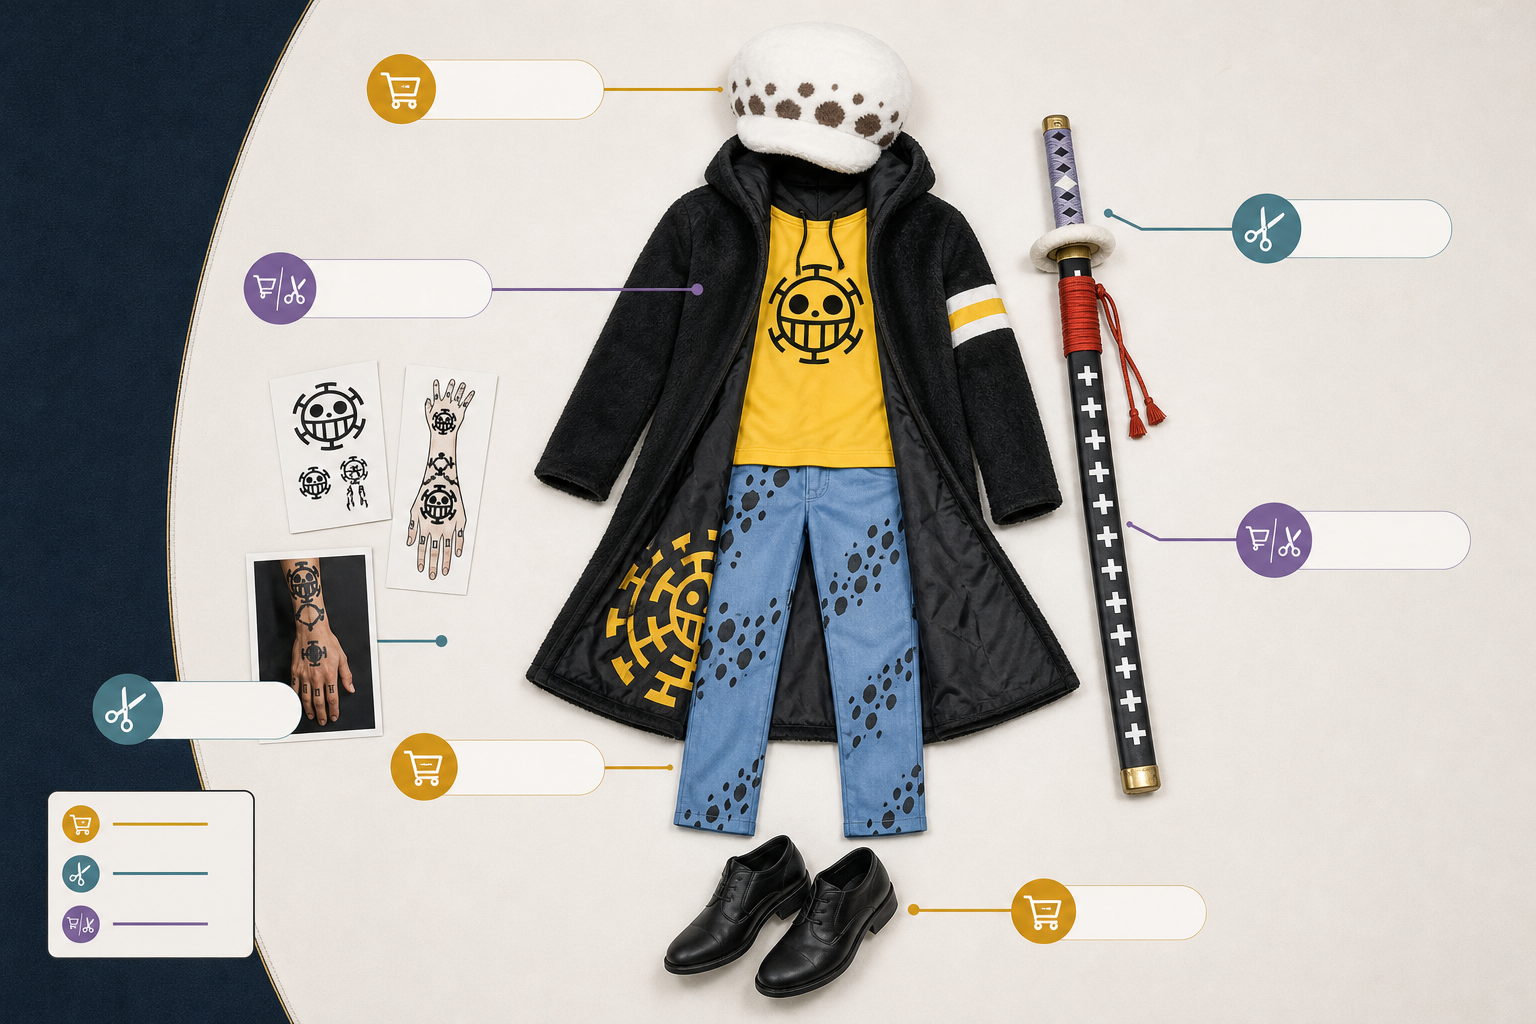
Law cosplay components labeled by buy, DIY, and hybrid build choices.
Put effort into silhouette, fit, tattoos, and a safe prop before minor details.
Component Best starting choice Why Common issue Practical upgrade
Spotted hat Hybrid Buying can give you a usable shape quickly. A floppy brim or loose fit. Adjust the inner band; add subtle weathering only after testing.
Coat, hoodie, or top layer Buy or hybrid Fit and clean construction take time to DIY. Boxy body, sleeves that are too long, shiny fabric. Hem sleeves, tailor side seams, or improve closures.
Pants Buy or adapt existing clothing Comfort and fit matter most here. Restrictive cuts or visible logos. Choose plain, comfortable basics and make small alterations.
Shoes Adapt or buy They need to survive walking. Costume shoes that hurt after an hour. Prioritize safe, neutral footwear over fragile accuracy.
Tattoos DIY This is a high-impact, low-bulk upgrade. Smudging or uneven placement. Use a stencil or temporary tattoo paper; bring touch-up supplies.
Kikoku prop Buy, DIY, or hybrid The right choice depends on skill, transport, and event rules. Heavy construction, sharp-looking edges, weak joints. Use lightweight materials and confirm prop policy first.

The hat: buy the form, customize the comfort

The hat is difficult to DIY well because the crown, brim, and spots all need to look clean at the same time. A bought hat can be a good foundation if its height and overall profile match your reference.

Check whether the band presses on your forehead or slides when you move. A simple fit adjustment can be more valuable than repainting every spot. If you change the pattern, work slowly and test paint or markers on an unseen area first.

The coat or top layer: fit is the real upgrade

A premade outer layer is often better value than making one from scratch, especially if you are new to sewing. But do not judge it only by the product image. Look for garment measurements, close-up photos, and a clear list of included pieces.

When it arrives, start with easy improvements: hem the sleeves, adjust the length, or take in loose side seams. If the fabric is thin, focus on neat pressing and clean layering rather than adding heavy materials that make it uncomfortable.

Tattoos: DIY delivers the most visible return

Temporary tattoo paper, body-safe makeup, or body-safe markers can all work. The best method is the one you can apply neatly and wear comfortably. Do a small skin test before the event, especially if you have sensitive skin.

Apply tattoos to clean, dry skin. Let each layer dry before adding a setting product, and avoid rubbing the area while dressing. Pack a small touch-up kit with your chosen product, wipes, and a reference image. Check that your removal method is appropriate for your skin and the product you use.

Kikoku: decide with safety and travel in mind

Kikoku can complete the look, but it is also the component most likely to create transport or venue problems. Check the convention’s current prop policy before you build or buy. Rules vary, and staff may inspect, tag, or require props to be secured.

A bought replica may save build time, but inspect its weight, seams, tip, and finish before relying on it. A DIY foam prop can be lighter and easier to repair, but it requires careful construction. Either way, avoid sharp edges, pack it securely, and bring a way to peace-bond it if the event requests one.

For ideas on choosing a character prop, compare options in our One Piece cosplay swords guide.

How to buy a Law cosplay without wasting money

A listing can be useful even when you plan to customize it. The goal is to buy a base you can actually wear, not to assume a product photo guarantees the result.

Check the listing before you order

Use this checklist:

  • Compare your body measurements with the seller’s garment measurements. If only a general size chart appears, ask for the measurements that matter most to you.
  • Confirm exactly what the set includes. A hat, belt, gloves, tattoos, or prop may be shown but not included.
  • Look for customer photos that show the fabric texture, seams, and fit from more than one angle.
  • Read the processing time and shipping estimate as separate steps. Leave room for delays and alterations.
  • Read the return terms before removing tags or changing the garment.
  • Check whether the material description is specific. “High quality” is not a fabric type.

Size for the largest measurement, then tailor down

If your measurements fall between sizes, the safer choice is often the one that gives you enough room in the shoulders, chest, hips, or thighs. It is generally easier to shorten a hem or take in a loose seam than to create extra room in a tight costume.

Try on the full costume with the underwear, shoes, and layers you expect to wear at the event. Move around before you decide it fits. A costume that looks right while standing may pull at the back or shoulders once you pose.

When a premade set is better value

A set is usually the better value when its price is close to the cost of fabric, closures, shipping, and basic tools for a DIY version—or when time is the resource you cannot replace. It is also a sound choice if you want to put your limited DIY time into tattoos, alterations, and prop finishing instead of constructing every garment.

Do not treat a premade set as a finished answer. Set aside time to steam wrinkles, test the hat, reinforce loose trim, and pack repair supplies such as safety pins, thread, tape, and a small stain wipe.

A practical hybrid build plan

For readers searching Trafalgar Law cosplay buy or DIY, this is the plan we would start with:
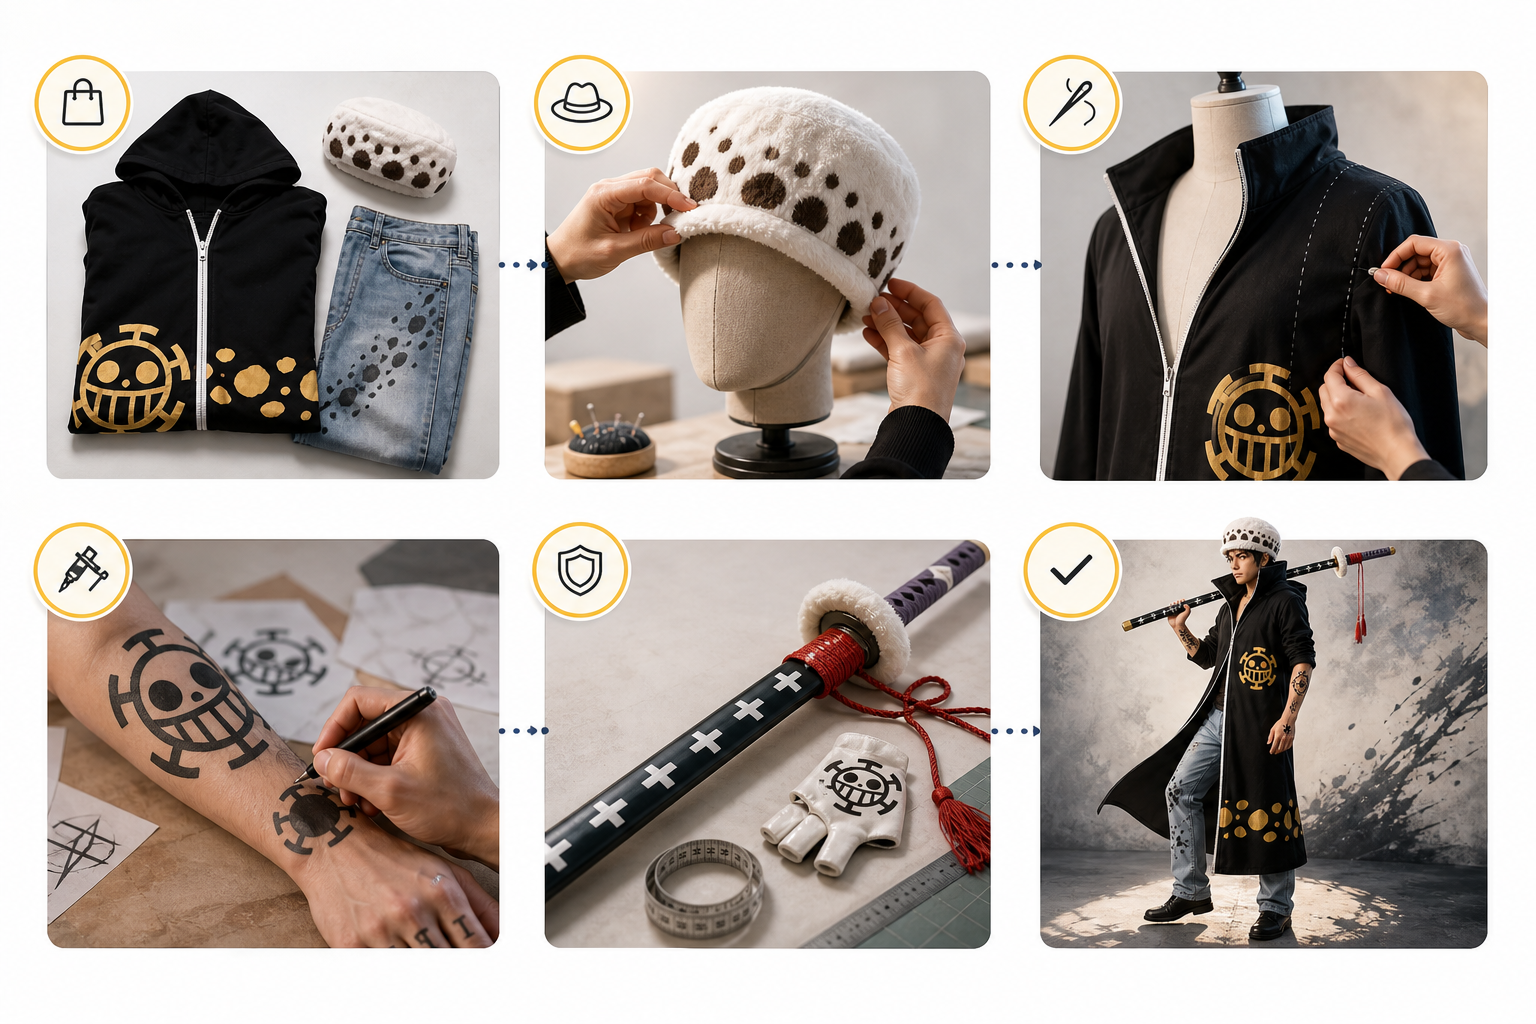
Six-step hybrid cosplay build checklist from base outfit to dress rehearsal.
A hybrid plan keeps first-time builds manageable while preserving room for personal upgrades.
  1. Buy or adapt the main clothing pieces. Prioritize a workable coat or top layer, pants, and shoes you can wear for hours.
  2. Choose the hat early. Its size affects the whole silhouette and it may need adjustment.
  3. Tailor the fit. Make the simple changes first: sleeves, hem, side seams, and closures.
  4. Add tattoos last. Practice placement ahead of time rather than learning on the convention morning.
  5. Decide on Kikoku after reading the venue rules. Bring it only if it adds to your experience and can be transported safely.
  6. Do a complete dress rehearsal. Wear every piece for at least a short walk and take a few photos in natural light.

This route avoids the biggest full-DIY traps: rushing a tailored outer layer, making a hat that collapses, or finishing a large prop too late to test it.

If you enjoy applying these fit and prop lessons to other characters, our Roronoa Zoro cosplay guide offers another One Piece build to compare.

DIY skills worth learning first

You do not need a full workshop to improve a bought costume. Start with skills that solve common problems and are easy to reverse.

No-sew upgrades

  • Steam or press the costume according to its fabric care instructions.
  • Use body-safe tattoo methods and practice the layout.
  • Replace an awkward closure with a more secure option if you know it will not affect returns.
  • Add light, controlled weathering only after you are happy with the fit.

Beginner sewing upgrades

  • Hem sleeves and pants.
  • Take in a side seam gradually after pinning and trying it on.
  • Reinforce loose trim or a stressed seam.
  • Add a simple internal attachment point so a layer stays in place while posing.

Leave these for a later build

Avoid rushing major pattern changes, hard armor, or a large sword build if you have not tested the materials before. These projects can be rewarding, but they need spare material, safety planning, and more time than they first appear to require.

FAQ

Which parts are hardest to DIY well?

The structured hat, tailored outerwear, and a durable con-safe Kikoku prop are usually the hardest. They rely on shape, fit, or construction strength. Beginners often get better results by buying a sound base and customizing it.

Should I buy a full set or buy the base and DIY upgrades?

Buy a full set if speed and convenience matter most. Choose a base plus upgrades if you want a better fit and more personal detail without committing to a full garment build. The hybrid route is often the best value for a Law costume.

What makes a Law cosplay look accurate in photos?

Start with the hat profile, outerwear silhouette, and clean tattoo placement. Then check color consistency and whether the costume sits correctly when you pose. Clear shapes tend to read better than many tiny additions.

How can I make tattoos last through an event?

Use skin-safe products, apply them to clean dry skin, give each layer time to dry, and carry a small touch-up kit. Test your process before the event so you know how it holds up on your skin.

Is it better to buy or DIY Kikoku?

Buy if you want a ready-made option and can confirm its size, weight, and event compliance. DIY if you have the right materials, time to test the build, and a need for a lighter or more customized prop. In either case, the convention’s current rules should guide the final decision.
Should You DIY or Buy Zoro Cosplay Swords?

Deciding should you diy or buy zoro cosplay swords comes down to one thing: what you need most—control or convenience. You’re not shopping for a functional w…

Should you DIY or buy Zoro cosplay swords? Start with your event rules, deadline, and how much customization you want. Zoro’s three-sword style makes this choice different from buying one prop: the weight, cost, build time, and chance of a prop-check issue all add up.

For most convention builds, a foam set or a bought set with light DIY upgrades is the lowest-stress route. Build from scratch when you want a specific version, custom proportions, or soft props designed around strict rules. Buy when you need matching swords quickly and can inspect the materials before the event.

This guide focuses on non-functional cosplay props. It does not cover sharpening, weapon use, or building functional swords.

The quick answer: DIY, buy, or use a hybrid approach

Choose DIY if you already enjoy prop making, have basic tools, and need control over the size, finish, or safety of each sword. A fully foam build can be light, easy to carry, and easier to adapt when an event has strict prop rules.

Choose buying if your convention is close, you want three matching scabbards and blades, or you do not want to buy supplies for one project. A ready-made set may still need touch-ups, but it gives you a usable base fast.

Choose a hybrid if you want the best balance. Buy a lightweight base set, then improve the parts that show most in photos: the hilt wrap, guard shape, scabbard finish, and blade paint. This is often the practical answer to should you DIY or buy Zoro cosplay swords when you want a strong look without making three props from zero.

Your priority Best starting route Why
Tight deadline Buy You can focus on fit, safety checks, and small repairs.
Strict convention rules DIY foam or a foam set Rounded, lightweight props are easier to modify for the event.
Close-up photos DIY or hybrid You can refine the finish and source-specific details.
First prop project Buy, then upgrade You avoid repeating a difficult first build three times.
Existing tools and prop skills DIY Your tool investment is already made, and custom work may be worthwhile.

Before choosing, read your event’s current weapons and props policy. Rules vary by convention, venue, and local law. A material that was accepted at one event may be denied at another.

Why Zoro’s three swords change the decision

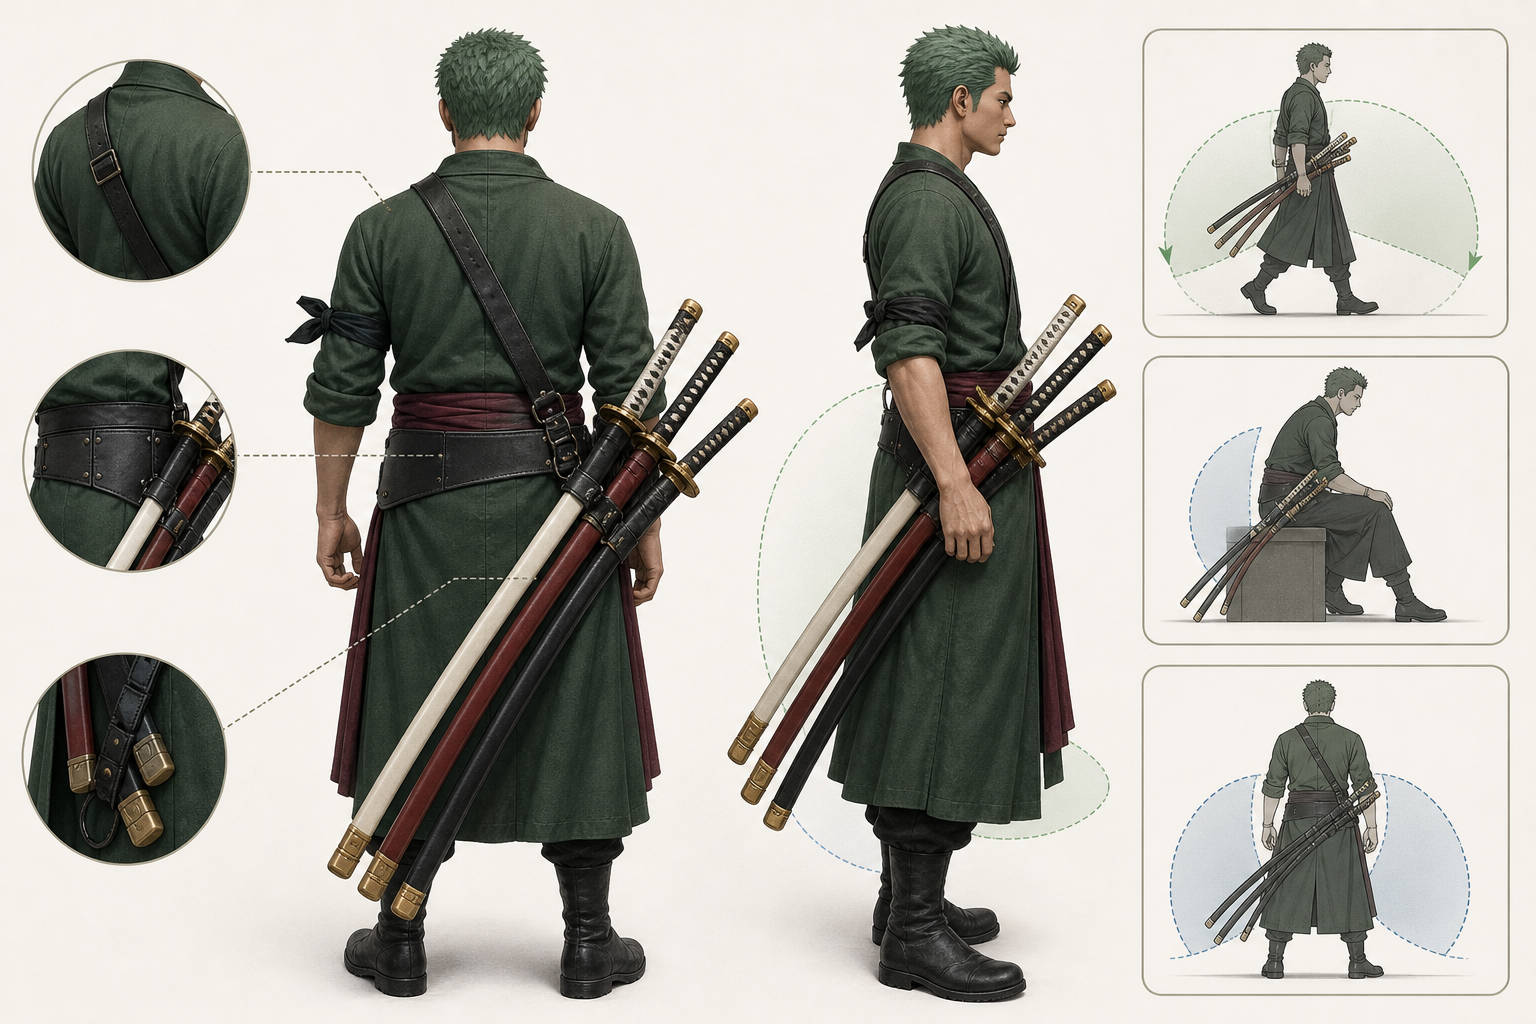
A single sword can be carried by hand or clipped to a simple belt. Three swords need a stable rig, enough space to move through crowds, and a plan for sitting, stairs, doors, and photos. The most accurate-looking set is not useful if it knocks into people or slips out of the scabbards every time you turn.

Diagram of a three-sword cosplay carry rig with scabbard placement and support straps.
Test the complete rig at home before bringing it to a convention.

Plan for weight and movement first

Test your full setup at home before con day. Wear the waistband, straps, scabbards, and all three swords for at least an hour. Walk through doorways, sit down, and turn in a tight space. Look for these problems:

  • Scabbards hitting your knees or the floor
  • Sword handles catching on sleeves, bags, or other attendees
  • A belt rolling or sliding down under the combined weight
  • Props bouncing loose when you walk
  • A sword that cannot be drawn or returned without snagging

Wide straps and a firm waist anchor usually work better than thin costume belts. Keep the set as light as you can. Comfort is not a compromise in a Zoro build; it is what lets you wear the cosplay all day.

Pick an accuracy target before you spend

Decide whether you are recreating a particular anime, manga, game, or promotional-art version. Then collect clear reference images for the sword guards, hilt wraps, scabbards, and color palette. A small reference board helps prevent the common “almost right” look: a mismatched guard silhouette, the wrong scabbard sheen, or wraps that are too loose.

For the rest of the costume, see our guide on how to cosplay Roronoa Zoro from One Piece. Matching the props to the clothing, sash, and overall silhouette will make the whole build read better than adding detail to the swords alone.

Materials: balancing realism, safety, and prop checks

There is no universal “con-approved” material. Event staff normally consider the object’s rigidity, sharpness, weight, appearance, and how it can be carried. Ask the event directly if its policy is unclear, especially before traveling with a rigid or metal prop.

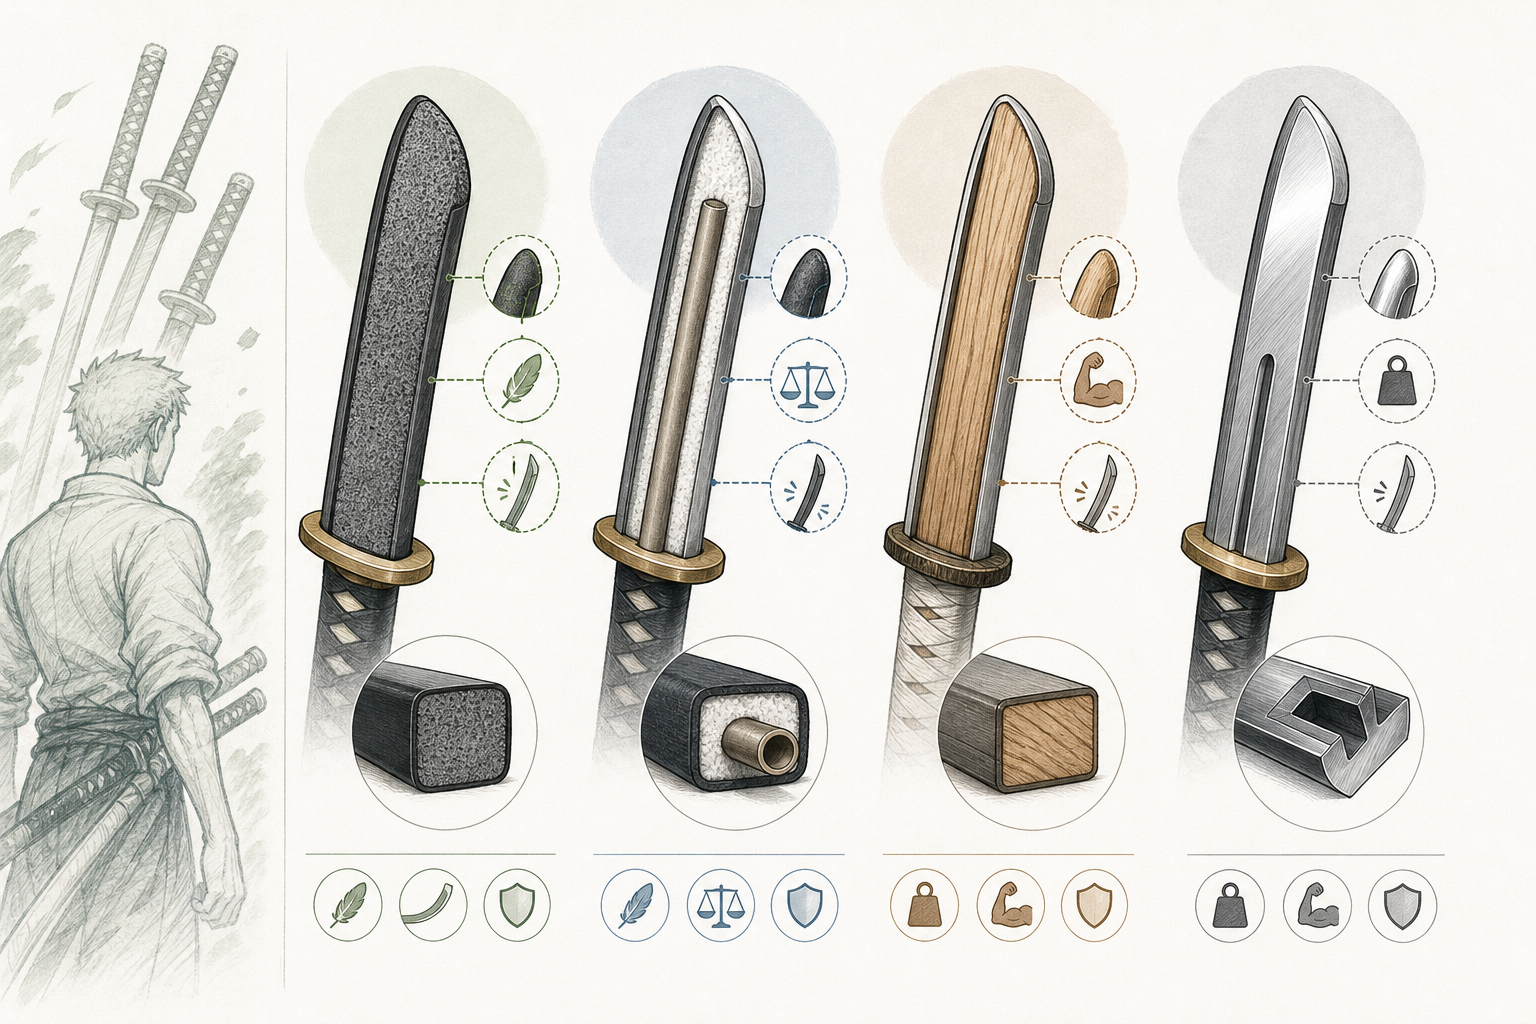
Comparison of foam, foam-core, wood, and metal cosplay sword materials.
Convention policies vary; check the event rules before choosing a material.
Material Strengths Watch-outs Best use
EVA foam Light, soft, easy to shape and paint Can dent or tear; needs sealing for a smooth finish Convention floor, travel, first-time builds
Fully foam construction Usually the softest option and easy to modify May flex too much if the blade is very long Events with strict safety expectations
Wood Straight, solid, useful for scabbards Rigid and potentially heavy; may draw more scrutiny Display, controlled photos, or only where rules allow
Plastic or resin Can hold crisp details Ranges from flexible to very hard; quality varies Bought props after checking dimensions and weight
Metal Strong visual realism Heavy, rigid, and often restricted or refused Display or private shoots where permitted

EVA foam is the practical default for many conventions

EVA foam can create clean blade profiles, shaped guards, and convincing scabbard details without adding much weight. Seal it before painting, use several light paint coats, and finish with a flexible clear coat. Keep tips rounded and edges blunt.

A core can make a foam sword straighter, but it changes the safety profile. If you add one, keep it fully enclosed, stop it well before the tip, and make sure the prop does not feel or behave like a baton. A fully foam blade is often the safer choice for a crowded event.

Wood, plastic, and metal need extra care

Wood can work well for a scabbard because it gives a clean, straight form. For a blade, its hardness can be a concern even if it has no sharp edge. Plastic ranges from lightweight PVC to dense resin, so do not assume that “plastic” means flexible or convention-safe.

Metal replicas can look impressive, but they bring the highest transport and prop-check risk. A cosplay sword-buying guide similarly distinguishes real swords for display or photos from general cosplay carry (Samurai Sword Man’s guide). Treat that as a caution, not a rule for every event: the convention’s written policy and staff decision control what is allowed.

What can fail a prop check

Policies differ, but common concerns include sharp points, sharpened edges, exposed hard cores, excessive weight, and props that can be swung with force. Carry swords in a bag or case until you reach the event. Bring simple materials such as tape or zip ties if the event uses peace-bonding to secure a prop in its scabbard.

Do not assume a “dull” metal blade is automatically acceptable. If there is any doubt, bring a foam alternative or leave the rigid prop at home.

When buying is cheaper than DIY

DIY can save money, but only when you count the full project. Three swords mean three sets of surfaces to cut, seal, paint, detail, and repair. Buying can be cheaper when you need a complete set quickly or do not already own the supplies.

Calculate the true DIY cost

List consumables as well as the headline materials. A foam build may require foam sheets, adhesive, filler, primer, paint, clear coat, wrapping material, and replacement craft blades. You may also need tools such as a heat gun, cutting mat, sanding supplies, and clamps.

Then include the cost of mistakes. A test piece that warps, a paint reaction, or a guard cut incorrectly may be small on one sword but frustrating when repeated across three.

DIY tends to make more sense when:

  • You already own the needed tools.
  • You want custom sizing for your height or carry setup.
  • You enjoy the making process.
  • You can start early enough to rebuild a part if needed.

Calculate the true buying cost

For bought sets, check more than the item price. Confirm shipping, taxes or customs where relevant, return conditions, what is included, and the stated dimensions and materials. Also budget for upgrades: bought props may need a better hilt wrap, a matte finish to remove plastic shine, soft tip covers, or repairs to loose guards.

Buyer reports can be useful for spotting inconsistent quality, but they are anecdotal. For example, a discussion of replica Zoro swords includes concerns about cheaply made products (Reddit discussion). Use reviews as one signal, then check recent customer photos, seller policies, and material details yourself.

Buying tends to make more sense when:

  • Your event is soon.
  • You need three matching swords and scabbards.
  • You do not want to invest in tools for one costume.
  • You can return the set if it arrives off-scale or unsafe.

The hybrid route often gives the best value

A bought base set plus a few targeted upgrades avoids the largest DIY time sink while improving what people notice. Prioritize these changes in order:

  1. Rewrap the hilts so the pattern is tight and even.
  2. Repaint the guards for crisp borders and the correct finish.
  3. Reduce unwanted scabbard shine with an appropriate clear coat.
  4. Add a secure carry rig that holds all three swords in place.
  5. Add subtle weathering only after the main colors are correct.

For ready-made options to compare, browse our One Piece cosplay sword picks. Check each listing against your own convention policy before ordering.

How to make DIY swords look convincing

Good shape and clean finishing matter more than complex effects. From several feet away, the guard outline, hilt wrap, scabbard color, and blade silhouette do most of the work.

Build one test sword before making all three

Make a paper template first. Cut one guard, test its scale against your costume, and check how it looks in photos. Build one sword all the way through before cutting materials for the other two. This lets you fix proportions and paint choices without repeating the same problem three times.

For foam, layer pieces to create thickness, then sand gentle bevels into the blade. Keep the tip rounded. Fill seams before priming so they do not show as dark lines in photos.

Use paint to suggest metal, not to imitate a real blade

A smooth dark base coat, restrained metallic paint, and a few lighter highlights can read as metal on camera. Heavy chrome paint and random scratches often look less convincing than a controlled finish.

Put weathering where use would naturally show: around the scabbard mouth, near the guard, and on hilt areas touched by hands. Keep the treatment subtle if your reference version has a clean anime look.

Upgrade the details that sell the prop

The hilt, guard, and scabbard are the fastest high-impact upgrades. Use a consistent wrap tension, make the guard symmetrical, and ensure each scabbard matches the blade it is meant to hold. If you add decorative engraving, create it with thin foam layers, paint, or shallow visual effects rather than cutting deep grooves into a soft prop.

For another approachable costume-making perspective, our Trafalgar Law DIY cosplay guide has ideas you can adapt to accessory planning and finishing.

How to shop for a bought Zoro sword set

A product listing should make it easy to answer three questions: What is it made from? How large and heavy is it? What exactly arrives in the box? If the listing is vague, treat it as a risk rather than a bargain.

Check these details before you order

  • Materials: Look for clear descriptions such as EVA foam, plastic, wood, resin, or metal.
  • Dimensions: Compare the total length with your height and your planned carry position.
  • Included parts: Confirm whether all three scabbards, guards, and straps are included.
  • Customer photos: These reveal scale, paint quality, and loose wraps better than studio images.
  • Return policy: Read it before you modify or repaint anything.
  • Delivery window: Leave time for inspection, repairs, and a replacement if needed.

Avoid listings that market a prop as “battle ready” or hide the tip and edge in every photo. Those signals suggest a product that may be unsuitable for a convention floor.

Do a safety and durability check when it arrives

Inspect the tips, edges, guards, wraps, and scabbard fittings. Gently test whether the hilt twists, whether the guard moves, and whether each sword stays in its scabbard when you walk. Fix loose cosmetic pieces before the event, and do not rely on a decorative strap to support a heavy prop.

If a bought sword is rigid or questionable, keep it for display or a controlled photo session and use a foam substitute at the convention.

Final checklist before con day

  • Read the current convention prop policy.
  • Confirm the material of every sword, not just the blade.
  • Round tips and remove or cover sharp corners.
  • Test the complete three-sword rig at home.
  • Pack a small repair kit with tape, a paint pen, and spare ties.
  • Transport props in a case or bag.
  • Bring a softer backup if your preferred set is rigid or metal.

The best Zoro props are the ones that look right, stay comfortable, and let you enjoy the event without a surprise at prop check. If you have time and want full control, DIY foam swords are rewarding. If you need speed and consistency, buy a set and improve the visible details. For many cosplayers, the hybrid route is the sweet spot.

The Best One Piece Anime Backpacks

Want to carry your favorite gear with style? Well, the best way to do that is with an anime backpack. We here at One Piece Theories understand the need and are here for the rescue. For that reason, we present today a list of our favorite one piece anime backpacks for you to choose from. Continue reading “The Best One Piece Anime Backpacks”

The Best Cheap Naruto Hoodies – Our Top Picks

Interested in the best cheap naruto hoodies? Then this is your post!

Anime has created a culture over the world. Millions of people watch a lot of series and share their hobby with everyone else. That’s why some of them choose to buy posters, collectible figures, albums and other merchandising stuff related to their favorite anime.  For that reason, we have chosen to review and suggest our favorite choices from One Piece, and other anime as well. Be sure to check our reviews and suggestions here!

One of the most popular anime ever is Naruto. Broadcasted in Japan from 2002 until 2017, this anime conquered the hearts of thousands around the world. A massive amount of merchandising was produced, so you can find any product you could imagine related to Naruto. However, today we’re going to forget all the interesting and weird stuff and focus on clothes.

A die-hard fan of any anime would love to have anime clothes. And what better piece of clothing than a good hoodie? Perfect to use on rainy days, hoodies are perfect for an anime fan.

If you like hoodies and Naruto, this is your post. We selected the best Naruto Hoodies you can buy from Amazon.

For our favorite One Piece hoodies, be sure to check this post!

Continue reading “The Best Cheap Naruto Hoodies – Our Top Picks”

Which One Piece Anime Hoodie to Choose

If you are here looking for a one piece anime hoodie, then look no further. OnePieceTheories has come to the rescue one more time(:P) with a list of our favorite hand-picked One Piece hoodies.

So, without further ado, let’s get to our suggestions. Continue reading “Which One Piece Anime Hoodie to Choose”